Stitched Fabric and Paper Book Tutorial . Part 1 of
2.
By
StitchyWooWoo
‘Little
Love Book’
In this tutorial you will learn how to combine
paper with fabrics, decorate and embellish with trim, text and stitch, to create a small book or journal for
your personal notes and collections.
This tutorial concentrates on a romantic and
delightful design called a ‘Little Love Book’. Filled with pretty pages and
charming words and sayings it is ideal as a place to put poems, letters, love
notes, anything that concerns the beauty of LOVE in your world.
Although this project can be done by hand
stitching, a sewing machine is desirable. Basic sewing skills are required.
So let’s get started….
Stage 1.Preparation
You
will need :
·
1 x 9” x 7” fabric for Outside
Cover
·
1 x 9” x 7” fabric for Inside Cover
·
1 x 4 ½” x 3 ½” fabric for back inside
pocket
·
2 x 10” x ½” torn fabric /ribbon for
ties.
·
4 x 6” x 8” drawing / watercolour paper for
pages
·
3 x 6” x 8” fabric for pages
·
Small amount x scraps of plain/ patterned fabrics, papers,
ribbon, trim, embellishments.
·
Selection of matching or
contrasting threads.
·
Fabric pens and/
or inkjet transfer paper (with access to computer and printer)
·
Sewing machine or hand
sewing kit.
·
Optional –small piece of
bondaweb / wonder under – fusible web.
·
Strong glue suitable for
fabric/paper – I find ‘tacky glue’ to be good for most things.
*All measurements are adjustable if needed. Your
book can be any size that you wish.
*For the purposes of this tutorial I am using
contrasting colour thread.
*Best fabrics to use: any natural fabric – cotton,
linen, wool calico, canvas. (Silk is best used for embellishment as it is more
difficult to sew well and it frays badly.
However a silk book does look wonderful). I am using vintage French cotton ticking for the cover, -
unbleached calico and 120lb cartridge paper for the pages.
* I mostly use straight stitch on the machine,
although you might want to use zigzag or a decorative stitch. I sometimes use a
darning foot with free motion embroidery to apply shapes such as hearts ( if you
know what how to do this then it’s easier, but don’t worry if you don’t know
what I am talking about,( that needs to be another tutorial !) then just use straight stitch) . NOTE ; when
sewing paper , use a long length stitch on your machine to help prevent the
paper from tearing.
Prepare your pieces as above. Cut to size.
Stage 2 Text/
Lettering/Shapes
There are a variety of ways to pre - decorate your
book with text and shapes
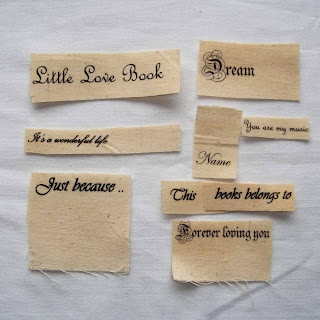
I do all my text onto small bits of plain fabric or
paper first and then apply these to the pages /cover.
Photo4 Text on fabric
1.
Hand write using fabric
pens.
2.
Use text/lettering
stamps and an ink pad.
3.
Print from computer
using a variety of fonts. Print onto heat transfer paper (remember it is
important to mirror image before
printing , otherwise your words will be the wrong way round.
4.
Lots of other ways to
get text in your book, try some of your choosing.
Choose appropriate words/sayings for your ‘little
Love Book’
Love ,
dream, believe, I love you, love me, love you, friend, lover, just because, you
are my sunshine, forever loving you, darling, my dearest, valentine……… Any
lines from songs or poems are also great.
As you can see I like to add:
This book belongs to
….
Name….
Little Love Book – as the
title.
In this tutorial my text is transfer printed from the computer and then
ironed onto small bits of calico/ linen.
*Bondaweb / Wonder Under – fusible web can be
ironed on to back of pieces to assist with sewing down. Use parchment paper to
stop the transfer print from sticking to your iron.

Applied Shapes
Hearts, flowers, anything connected with love. With
complicated shapes I do use fusible web. I iron web onto small fabric piece,
draw a shape, and then cut the fabric
shape before removing the
backing paper. Remove backing paper and
iron on.
Once you have all your text and shapes prepared you
can then think about where you are going to place them your pages.
This is Part 1 of
this tutorial.


No comments:
Post a Comment